
Nine Pointed Star Baha'i Candle Molds
Tools Used: Adobe Illustrator, Autodesk TinkerCAD, Cricut Design Space
"Concerning the number nine: the Bahá'ís reverence this for two reasons, first because it is considered by those interested in numbers as the sign of perfection. The second consideration, which is the more important one, is that it is the numerical value of the word "Bahá'"… Besides these two significances the number nine has no other meaning. It is, however, enough to make the Bahá'ís use it when an arbitrary number is to be chosen." — Shoghi Effendi
Summary
This is a set of hand-designed nine pointed star shaped molds for tealight and votive candles. They will work with beeswax, paraffin, soap, plaster, resin, chocolate, candy, or other casting materials. Includes gift boxes.
Tealight Candle Mold
- Tealight candles measure approximately 1.5" in diameter and 3/8" tall
- Includes one model with a hole in the center for candle wicks and one without
- Print in TPU-85A
Votive Candle Mold
Update: Now includes a two-part mold that can be fully 3D printed, with no silicone required.
Two Part Votive Mold (with seam)
- Print in TPU 95A or softer at 40% infill
- Votive candles measure approximately 2" x 2"
This model can be fully 3D printed without the need for silicone. The disadvantage is the less attractive seam across the top. See below for a seamless mold. Note that PLA or other firm filaments are NOT recommended for this model. TPU will bend a little, making it easier to remove the candle from the mold.
Instructions
- Secure both pieces of the mold together with a rubber band
- Place a wick through the hole in the bottom
- Fold the wick so it lays flat along the bottom of the mold
- Tape the bottom, making a seal, and tape again around the wick
- Pour a small amount of wax into the bottom and allow it to set before filling
Because of the hole for a wick, this model is prone to leaking a bit. Scotch or cello tape works best for making a good seal. PLA or other firm filaments are NOT recommended for this model. TPU will bend a little, making it easier to remove the candle.
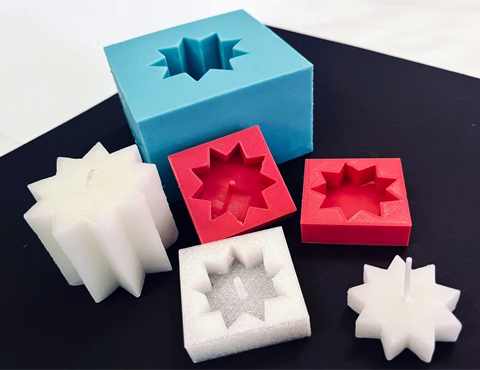
Silicone Votive Mold (Seamless)
- Print in PLA and cast in silicone
- Make sure to measure carefully and fill the mold all the way up
- Votive candles measure approximately 2" x 2"
Note: there is no hole for a wick in this model. To make your own hole, draw lines from corner to corner on each side, then cross them with two lines through the middle horizontally and vertically (X,Y). That will show you the center of the mold. Poke a hole with a bamboo skewer or awl.
To use, feed the wick through the hole before pouring the wax. Seal the hole with tape. This will produce much more attractive candles.
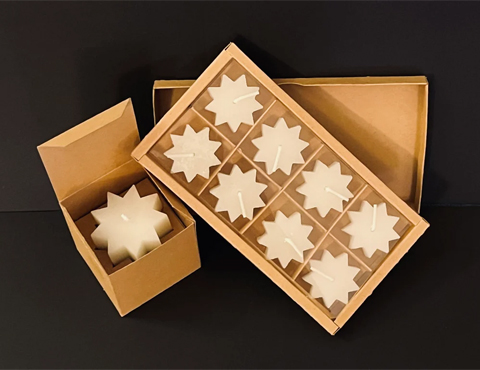
Gift Boxes
Two boxes are included, one for a single votive candle and one for a set of eight tealight candles. I have included SVG files here. Ready-made Cricut files for both boxes are available in Cricut Design Space.
Assembly Instructions
Votive Candle Box
Cut and fold all pieces:
- Box
- Insert
- Overlay
- Riser
- Riser Support
Votive Candle Box Assembly
- Glue the main box
- Glue the overlay to the insert. Fold and set aside
- Glue the riser support to the bottom middle of the riser
- Glue the riser to the support, creating a single piece
- Glue the insert to the riser
- Glue the riser to the bottom of the box
- Insert a votive candle into the box and close with a sticker or tape.
Tealight Candle Box
Cut all pieces:
- Box
- Lid
- Transparent insert*
- Riser
- Riser Support
*Note: The scoring wheel will not work well on transparencies. To score a transparency sheet on the Cricut Maker, use the perforation wheel and tell it that it's light cardboard. Cut as usual with the fine point blade. Adjust pressure according to your material. I used basic overhead ink jet printable transparency sheets with no trouble.
Tealight Candle Box Assembly
1. Assemble the Box
- Fold all score lines both forward and back
- Glue three of the tabs
- Fold over three sides, one at a time and glue to the base
- Glue the fourth tab
- Fold over the fourth side
2. Assemble the Lid
- Fold all score lines both forward and back
- Re-fold foward
- Glue all sides, using binder clips to hold them in place
3. Assemble the inserts
- Assemble the inserts
- Fold and glue horizontal dividers
- Fold larger vertical divider and glue the middle together
- Glue the vertical divider to the bottom of the box
- Insert horizontal dividers
Finish the Box
- Fill the box with eight (8) tealight candles
- Cover the candles with the transparent insert
- Close the lid and seal with stickers or tape
Materials used in the photograph
- NinjaTek NinjaFlex TPU (85A Shore Hardness)
- WICK Candle Making Bees Wax
- DGQ Natural Candle Wicks, 3.5" and 1.125"
- Let's Resin Silicone Mold Making Kit 15A
- Cricut Kraft Board, Natural
- Highland Transparency Film 901 (for copiers)